![Upgraded Pulley Belt Parts for Samsung Dryer, 6602 001655 Dryer Belt and DC93-00634A Idler Pulley [Enhanced ],DC61-01215B Tension](https://m.media-amazon.com/images/I/71+5iq-gj6L._SX522_.jpg)
Upgraded Pulley Belt Parts for Samsung Dryer, 6602 001655 Dryer Belt and DC93-00634A Idler Pulley [Enhanced ],DC61-01215B Tension
- Pulley for Samsung Dryer Include : 1 * UPGRADED DC93-00634A Samsung Dryer Idler [Dual Ball Bearings], 1 *.
- Premium Quality Product : 6602 001655 Dryer Belt is TWICE as thick as it was before, made of black rubber.
- DC93-00634A Samsung Dryer Idler replaces AP6038887, DC96-00882B, DC96-00882C, PS11771601, AP4213616.
- 6602 001655 Dryer Belt is TWICE as thick as it was before, made of black rubber, non-cracking, high wear.

279640 Dryer Idler Pulley Replacement Part By DR Quality Parts - Compatible for Whirlpool & Kenmore Dryer - Replaces 697692,
- 279640 Dryer Idler Pulley - Replaces 279640VP, 2958, 3388672, 697692, AP3094197, ER279640, W10468057
- The dryer idler pulley also known as the belt tension pulley wheel is compatible with Kenmore, Whirlpool.
- Does not rotate/spin, will not start, drum spins but clunks and more
- Made to EXACTLY FIT just as the original dryer pulley without any modifications for a fast and easy.

BlueStars Unbreakable W10837240 Dryer Idler Pulley With Bracket - Compatible with Whirlpool Kenmore Dryer - Replaces W10118756
- 𝐏𝐞𝐫𝐟𝐞𝐜𝐭 𝐦𝐚𝐭𝐜𝐡: The W10837240 Dryer Idler Pulley is compatible with various models of these brands:.
- 𝐅𝐢𝐭 𝐦𝐨𝐝𝐞𝐥𝐬: [Kenmore] - 106.97502820, 10687884100, 10687884100, 10687884600, 110.6007299, 110.6090199.
- 𝐒𝐦𝐨𝐨𝐭𝐡 𝐚𝐧𝐝 𝐪𝐮𝐢𝐞𝐭 𝐝𝐫𝐲𝐢𝐧𝐠 𝐨𝐩𝐞𝐫𝐚𝐭𝐢𝐨𝐧: BlueStars’s W10837240 Dryer Idler Pulley plays an important role in.
- 𝐃𝐮𝐫𝐚𝐛𝐥𝐞 𝐦𝐚𝐭𝐞𝐫𝐢𝐚𝐥: This Idler Pulley has a durable metal construction with a smooth surface to reduce.
A dryer drum that refuses to spin, or spins slowly and squeals loudly, often points to a worn or broken drive belt. This component is essential for rotating the drum, allowing clothes to tumble and dry evenly. This guide offers step by step instructions for popular models such as Whirlpool, Samsung, and LG dryers, helping you restore your appliance's functionality.
Why Dryer Belts Break and What the Symptoms Are
Dryer belts are sturdy, but they do wear out over time. They are made of rubber or a synthetic material and are under constant tension. Common reasons for failure include:
- Age and Wear: Over years of use, the belt material degrades, cracks, or frays.
- Overloading the Dryer: Consistently stuffing the dryer with too many heavy items puts excessive strain on the belt and motor.
- Idler Pulley Failure: The idler pulley maintains tension on the belt. If it seizes or its bearing fails, it can cause the belt to rub, fray, and eventually break.
- Drum Roller Issues: Worn drum rollers can cause the drum to drag, increasing friction on the belt.
Signs You Need to Change Your Clothes Dryer Belt
Recognizing the symptoms early can prevent further damage to your appliance. If your electric dryer takes too long to dry clothes, a failing belt could be a contributing factor, though other issues like a clogged vent are more common. Here are the most direct indicators of a broken or failing dryer belt:
- Drum Does Not Spin: This is the most obvious sign. The motor might hum, but the drum stays still.
- Loud Squealing or Thumping Noise: A worn belt can squeal as it slips. A thumping noise might indicate a broken belt flapping or other issues like worn drum rollers. If you hear loud thumping, refer to our guide on dryer making loud thumping noise when running.
- Slow Drum Rotation: The drum might spin, but at a reduced speed, which can be hard to notice without direct observation.
- Burning Smell: A slipping belt can create friction and heat, leading to a burning rubber smell.
Tools and Materials for Dryer Belt Replacement
Gathering your tools before you start will make the process smoother. Most of these items are common household tools.
- New dryer belt (specific to your dryer's make and model)
- New idler pulley (recommended, as it often wears out with the belt)
- Phillips head screwdriver
- Flathead screwdriver
- Nut drivers (1/4", 5/16", 3/8" are common sizes) or a socket wrench set
- Pliers
- Work gloves (to protect hands from sharp edges)
- Small container or magnetic tray for screws
- Flashlight or headlamp
- Cordless drill with appropriate bits (optional, but speeds up screw removal)
Safety First: Important Warnings
Working with any appliance requires caution. Electrical components and sharp metal edges are present inside a dryer.
Always disconnect the dryer from its power source before starting any repair. Unplug it from the wall outlet. For gas dryers, also turn off the gas supply valve. Make sure no power reaches the unit. An electrical test kit can confirm power is off if you are unsure.
Wear work gloves to protect your hands from sharp metal edges inside the dryer cabinet. The edges can be surprisingly keen.
How to Replace a Dryer Belt: step by step Guide
The general process for how to change a clothes dryer belt is similar across most brands, including Whirlpool, Samsung, Maytag, and LG. The main differences lie in how you access the dryer's interior.
Step 1: Disconnect Power and Move the Dryer (Approx. 5-10 minutes)
Pull the dryer away from the wall. Make sure there is enough space to work behind and around it. Unplug the power cord from the wall outlet. If it is a gas dryer, turn off the gas supply valve and disconnect the gas line. Also, disconnect the exhaust vent hose from the back of the dryer.
Step 2: Access the Dryer Interior (Approx. 15-45 minutes)
This is where dryer models vary the most. You will need to remove either the top panel and then the front panel, or just the front panel directly.
For Whirlpool and Maytag Dryers (often front-access):
Most Whirlpool and Maytag models require removing the front panel. Look for two screws at the bottom front of the dryer. Remove these. Use a flathead screwdriver to release two spring clips located under the top panel, near the front corners. Carefully tilt the top panel up and back. This reveals the wires connected to the door switch. Disconnect these wires. You can now lift and remove the entire front panel.
For Samsung and LG Dryers (often top-access then front-access):
Many Samsung and LG dryers require removing screws from the back of the top panel. Slide the top panel backward and lift it off. Then, you will typically find screws along the top edge of the front panel that secure it to the side panels. Remove these. You may also need to remove screws along the bottom of the front panel. Disconnect any wires for the door switch or moisture sensor before completely removing the front panel.
Step 3: Remove the Drum (Approx. 10-20 minutes)
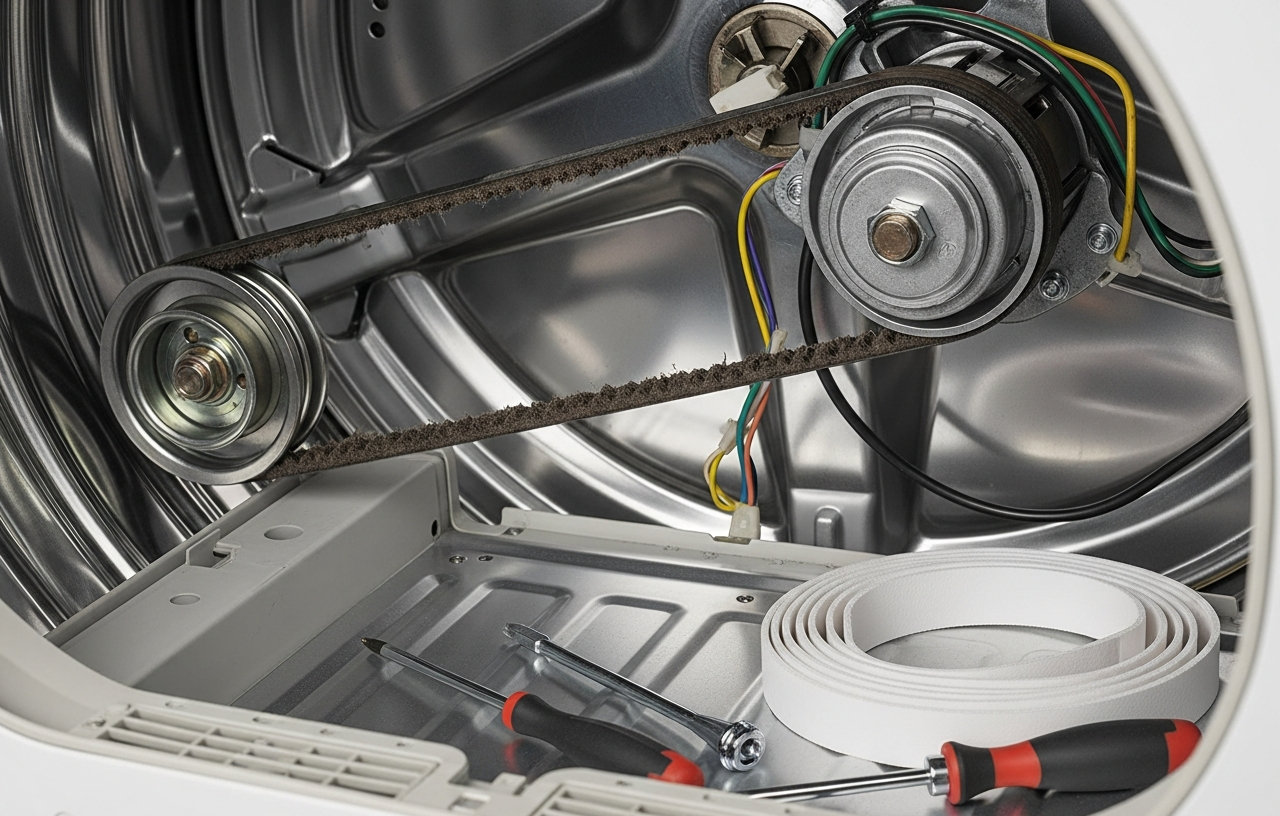
With the front panel off, the drum is now accessible. The drum is supported by rollers at the back and sometimes at the front. The drive belt will be wrapped around the drum and connected to the motor pulley and idler pulley at the bottom.
First, note the path of the old belt around the motor and idler pulley. Lift the drum slightly from the front and carefully pull it forward. The idler pulley will likely spring back once tension is released. Support the drum as you remove it from the cabinet and set it aside. Be gentle; the drum can be heavy and awkward.
Step 4: Remove the Old Belt and Idler Pulley (Approx. 5-10 minutes)
The old belt should now be completely detached from the drum. If it's broken, pieces might be in the bottom of the dryer cabinet. Remove all fragments. Now is an excellent time to replace the idler pulley, even if it seems okay. A failing idler pulley is a common cause of belt breakage and can lead to a noisy dryer. To remove it, typically you will unbolt it from the dryer chassis. Make sure to note how it was oriented.
Step 5: Inspect Other Components (Approx. 5-10 minutes)
Before installing new parts, inspect other wear items. Check the drum rollers at the back of the dryer cabinet for flat spots, excessive wear, or squeaking. Inspect the motor pulley for any damage or debris. Also, look at the blower wheel at the back of the dryer. Make sure it spins freely and is not clogged with lint. Replacing worn rollers now can prevent future repairs and improve drying efficiency.
Step 6: Install the New Idler Pulley (Approx. 5-10 minutes)
Place the new idler pulley in the same position and orientation as the old one. Secure it with the bolt(s) you removed earlier. Make sure it spins freely and has proper tension. For Whirlpool and Kenmore models, a new idler pulley can be found in options like the 279640 Dryer Idler Pulley Replacement Part by DR Quality Parts or the BlueStars Unbreakable W10837240 Dryer Idler Pulley With Bracket. Both are designed for smooth and quiet operation.
Step 7: Install the New Belt on the Drum (Approx. 10-15 minutes)
Take your new dryer belt. Wrap it around the dryer drum, about 2-3 inches from one end. Make sure the ribbed side of the belt faces the drum, as this is the side that makes contact with the motor pulley. Some belts are smooth on both sides. Place the drum back into the dryer cabinet, carefully resting it on the rear support rollers.
Step 8: Route the Belt Around the Motor and Idler Pulley (Approx. 10-20 minutes)
This is often the trickiest part. Reach underneath the drum from the front. Pull the loose end of the belt down towards the motor. Loop the belt around the motor pulley. Then, route it around the idler pulley. The idler pulley should apply tension to the belt, pressing it against the motor pulley. The exact path can vary slightly, but generally, the belt forms a 'W' shape around the motor pulley and idler pulley. Rotate the drum by hand several times to make sure the belt is seated correctly and moves smoothly without rubbing any other components.
For Samsung dryers, a common replacement part is the Upgraded Pulley Belt Parts for Samsung Dryer. This kit often includes a thicker, premium quality belt (6602 001655) and an enhanced dual ball bearing idler pulley (DC93-00634A), which can offer improved durability.
Step 9: Reassemble the Dryer (Approx. 15-45 minutes)
Reverse the disassembly steps. Reattach the front panel, making sure to reconnect any electrical wires for the door switch or moisture sensors. Secure all screws. Reattach the top panel. Reconnect the exhaust vent hose and, for gas dryers, the gas line. Push the dryer back into its position.
Step 10: Test the Dryer (Approx. 5 minutes)
Plug the dryer back into the electrical outlet. For gas dryers, turn the gas supply back on. Run a short, empty cycle (like an air fluff or low heat cycle). Listen for any unusual noises, like squealing or grinding. Watch the drum to make sure it spins smoothly and at a normal speed. If everything sounds and looks correct, your dryer belt replacement was successful.
Troubleshooting After Replacing the Belt
If your dryer still does not spin or makes strange noises after replacing the belt, re-check these common issues:
- Belt Routing: Make sure the belt is routed correctly around the motor and idler pulleys. An incorrect path will prevent proper operation.
- Idler Pulley: Double-check that the idler pulley is securely installed and spins freely. If it's seized, it will prevent the belt from moving.
- Drum Rollers: If the drum rollers are severely worn, the drum might still drag, putting strain on the new belt or causing thumping.
- Motor: In rare cases, the motor itself could be failing. If it hums but doesn't spin the pulley, it might need replacement. This is a more advanced repair.
- Door Switch: Make sure the door switch wires are properly reconnected. A faulty door switch will prevent the dryer from starting at all.
When to Call a Professional
While replacing a dryer belt is a common DIY fix, some situations warrant calling an appliance repair technician. If you encounter significant electrical issues beyond simple wiring reconnections, or if the dryer motor itself appears to be faulty, professional help is advised. Service calls for dryers typically cost $80-$150, plus the cost of labor (often $75-$150 per hour) and parts. This can quickly add up, but a professional has specialized tools and experience for complex diagnostics.
Maintain Your Dryer for Longevity
Regular maintenance can extend the life of your dryer and prevent belt failures. Make sure not to overload the dryer, as this stresses the motor and belt. Clean the lint filter after every load and periodically check the exhaust vent for blockages. Keeping your appliances in good working order can save you money and headaches. For more tips, check out our home appliance maintenance checklist.
Upgraded Pulley Belt Parts for Samsung Dryer, 6602 001655 Dryer Belt and DC93-00634A Idler Pulley [Enhanced ],DC61-01215B Tension
- Pulley for Samsung Dryer Include : 1 * UPGRADED DC93-00634A Samsung Dryer Idler [Dual Ball Bearings], 1 *.
- Premium Quality Product : 6602 001655 Dryer Belt is TWICE as thick as it was before, made of black rubber.
- DC93-00634A Samsung Dryer Idler replaces AP6038887, DC96-00882B, DC96-00882C, PS11771601, AP4213616.
- 6602 001655 Dryer Belt is TWICE as thick as it was before, made of black rubber, non-cracking, high wear.
279640 Dryer Idler Pulley Replacement Part By DR Quality Parts - Compatible for Whirlpool & Kenmore Dryer - Replaces 697692,
- 279640 Dryer Idler Pulley - Replaces 279640VP, 2958, 3388672, 697692, AP3094197, ER279640, W10468057
- The dryer idler pulley also known as the belt tension pulley wheel is compatible with Kenmore, Whirlpool.
- Does not rotate/spin, will not start, drum spins but clunks and more
- Made to EXACTLY FIT just as the original dryer pulley without any modifications for a fast and easy.
BlueStars Unbreakable W10837240 Dryer Idler Pulley With Bracket - Compatible with Whirlpool Kenmore Dryer - Replaces W10118756
- 𝐏𝐞𝐫𝐟𝐞𝐜𝐭 𝐦𝐚𝐭𝐜𝐡: The W10837240 Dryer Idler Pulley is compatible with various models of these brands:.
- 𝐅𝐢𝐭 𝐦𝐨𝐝𝐞𝐥𝐬: [Kenmore] - 106.97502820, 10687884100, 10687884100, 10687884600, 110.6007299, 110.6090199.
- 𝐒𝐦𝐨𝐨𝐭𝐡 𝐚𝐧𝐝 𝐪𝐮𝐢𝐞𝐭 𝐝𝐫𝐲𝐢𝐧𝐠 𝐨𝐩𝐞𝐫𝐚𝐭𝐢𝐨𝐧: BlueStars’s W10837240 Dryer Idler Pulley plays an important role in.
- 𝐃𝐮𝐫𝐚𝐛𝐥𝐞 𝐦𝐚𝐭𝐞𝐫𝐢𝐚𝐥: This Idler Pulley has a durable metal construction with a smooth surface to reduce.


